Monday, December 8, 2008

Bianca, Complete!

I am so happy to finally be finished with this sweater! I got absolutely nothing accomplised yesterday aside from putting Bianca together. I was so excited that I even wore it today! It was surprisingly warm for this 38-degree morning.

I have to admit that I didnt' realize what I was getting myself into when I decided I could re-create the Lucy sweater from the Fossil Holiday 2008 catalog. The knitting itself was not difficult. But, first I had to take measurements and use them to calculate gauge - without the inspirational sweater, then draw a schematic, and improvise throughout. My head spun a couple of times!

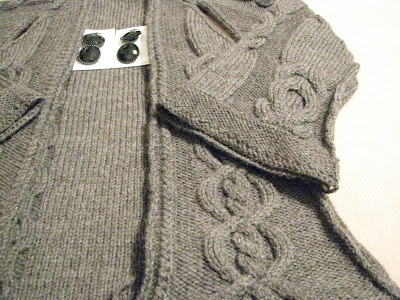
First, I had a hard time figuring out how to get the hems to stand out from the rest of the knitting. In hindsight, accomplishing this was definitely easier and less time consuming than the method I chose. Initially, I knitted a very tight garter stitch for the hem but it looked way too homemade. I hated it by the time I was done knitting the back piece. So, I ended up doing a psuedo-steeking exercise to get them just right. There was something very horrific about cutting into my knitting, but the seams I sewed in (by machine) worked just fine. I even went back and sewed them two more times to be sure I wouldn't unravel!


As for the fit, I could be a little happier. I don't know whether to blame it on the mediocre yarn or the amount of cables, but the sleeves didn't block out as much as I would have liked. They are a bit tight - but I'm hoping they'll stretch. Maybe I'll use a little steam? It also annoys me that the edges of the button band tend to curl inward, and the side seams aren't laying flat enough. Again, I think steaming may help.


Aside from those few peeves, I love the sweater. It turned out almost exactly the way I wanted. And best of all - I had fun knitting it! My first thought was to knit it in some gorgeous Plymouth Tweed I have, but for some reason, I couldn't vision this sweater being tweed. Besides, I'd much rather stare at the skeins of yarn I already own than knit with it. That almost makes as much sense as buying yarn when I have plenty stuffed in various places around my home!!

The details:

  • Yarn: Patons Classic Wool (merino is missing on the label); almost 5 skeins; dark gray mix
  • Needles: US 7 for the body & US 6 for the hems/button bands
  • Began November 17, ended December 8 (took almost a week off for Thanksgiving)

Do you see that eerie blue glow? I forgot to turn the tv off.


I must say that after spending an hour taking photos, I have got to figure out how to take better indoor pictures on my digital camera. It does great outdoors in natural light and when I use the flash indoors, but the flash completely destroys the the colors and fine details. I've seen so many great pics taken with the same Canon Powershot I have on the Flickr group for this camera. I need to learn! Note to self: New Years resolution!


This will most likely be my last sweater for the year. Even though I don't have any knitted gifts planned, I really need to start applying myself to shopping......of course, I could always whip out a project with the aforementioned Plymouth Tweed.....

Friday, December 5, 2008

Progress / Unprogress

I was so excited last night to begin the final finishing process on my much-thought-about Bianca cardigan. Since I am not working with a pattern, its a little nerve-racking to see if it will turn out right in the end. And, I'll admit, I acutally like the finishing process. It's all about the process.


Last night, however, a bit of that excitement turned to frustrated defeat. Maybe I was just a little too excited to finish. Or, perhaps my multitasking is to blame: I was trying to talk on the phone with family, watch tv, and knit all at the same time. Either way, I picked up stitches along the front for the button bands, and ended up with way too many stitches. After knitting for four inches and casting off, I realized what I had done. I immediately frogged the section, as if quickly disposing of the evidence would make me feel better about the hours I wasted.
This morning I feel better about it, and when I pick it back up this evening, I'll be more attentive to it.


I did manage to take some pics this morning:


Maybe tomorrow, I'll be able to share modeled shots.

Thursday, December 4, 2008

And So It Begins

It appears that the inevitable has happened once again. The holidays are here! I am a little ashamed to say that I don't have any knitted gifts planned this year, for the same reason as last year: I just don't have the time or patience right now. I feel like I am constantly saying that!
I must confess that it has been taking a little more effort for me to embrace the excitement of the season. While I do love all the anticipation and joy, I let myself get so stressed.

Anyway, our family had a great Thanksgiving. My husband comes from a very big family and every year they hold a family reunion. We all stay in cabins in the woods and eat and visit. The group area is alongside a river. Across the river runs a pedestrian suspension bridge - it moves when you walk across! There is a seventy year old lodge made out of huge logs and a tin roof. We ate dinner there in the ambience of candlelight and two wood burning fireplaces on either side of the room.
This is the suspension bridge and just to the right of this is where the lodge was. Too bad I didn't get any pictures that captured the rustic beauty of it =(


And, who says you don't get to see the season change in the south?? Look at this!


Even though I had to put the knitting needles (my husband prefers "chopsitcks") down, and I would have already been done with Bianca, it was great to getaway and do something different.

By the way, I should be done with the sweater in the next couple of days. I finally made it to the finishing process. I actually enjoy that part though! I am excited for it to be done. Pics soon!

Monday, December 1, 2008

September Sweater Tutorial, Complete!

Please be advised that this was composed from pages of scribbled notes (I'll do better next time, promise!). I tried to proof to make sure it made sense, but it may look like absolute gibberish.

I can make a "free Ravelry download", just don't have the time at the moment.


If you have questions, feel free to drop me a line.
Contact me:
stepheely@aol.com
Ravelry

September Sweater


Preface:
I am not a paid designer. I knit purely for enjoyment! I have never written a pattern with the intention of anyone using it besides myself. However, I had such a response on Ravelry from people who wanted to knit this sweater that I decided to try to organize my notes and come up with guidelines by which to knit something similar to it. I’ll include the cable patterns I used (on the last page), but I don’t remember exactly how I worked the decreases into the cable pattern around the neck area, so I’m leaving you to be creative and pick your own cables.
I will be happy to try to answer questions via my message box on Ravelry, but I can’t be an over-the-shoulder coach! For me, figuring out the quirks and researching to learn new techniques is part of the fun of knitting.

Notes on Construction:
This sweater offers unusual, but simple construction. It is knit sideways starting at the left sleeve. Stitches are then cast on either side of the sleeve to account for the yoke. Then, stitches are decreased to knit the right sleeve. The most confusing part (for me) is casting off and shaping the neck area.
Once the yoke and sleeves are complete, sections are picked up and knit to form the back and fronts. Then, the collar and button bands are picked up and knit last. There is very little seaming involved, but the picking up of stitches creates a type of seam that gives the sweater structure.

Materials
*2 skeins of Lion Brand Fisherman’s Wool – or any other worsted weight yarn that will block nicely (blocking is important for this sweater)

*US size 7 (4.5mm) circular knitting needles

*Whatever materials you use to block – I use big beach towels, a windex bottle full of water, and a bunch of straight pins

*Darning needle

Gauge:
4 sts/inch – the gauge of the rows is not so important, since you will be measuring the length as you go.

Begin at Left Sleeve:
CO 100 sts
Work 2 inches in 2x2 rib
Cable set-up row
Work in pattern for 6-7 inches (or however long you want the sleeve to be).


Adding stitches for yoke:
Using the cable method, cast on 20 sts at the beg of next two rows.
Work cable set-up row – work to match cable pattern on sleeve.
Take the time to recognize how the sweater is already shaping up. Your left sleeve is complete and if you are looking at the RS of the work, the stitches on the left hand side are the front of your sweater and the stitches on the right hand side are the back.

Work in pattern until the piece measures 4.5-5.5 inches from the newly casted on yoke sts. (depending on your bust)

Next row (RS): work 71 sts and join new ball of yarn. Cast off 6 sts for neck, work to end of row. At this point, the back and left front sections are separate, and should be worked separately.
Next row (WS): work all sts in patt until last 2 sts, p2tog. Making sure you keep sts separate, work across the back sts.
Next row: work in patt across
Next row: work in patt, repeating the same decrease for neck as last RS row.
Now you will only work the sts on the front. The back sts will be worked later.
Next row: Repeat decrease at neck on EVERY row. RS rows decrease at beg of row, WS rows decrease at end of row. Work four more decreases – 6 total sts have been decresed at neck. Now cast off the front sts.

Continue working the back for approx 6.5 inches – end on RS row – and put all sts on holder (I kept mine on the needles since I have multiples)

Right Front:
Using new thread, cast on 47 sts (or the amount you casted off from the left front)
Work cable set-up row – mirror the cable pattern on the left front piece.
Next row (WS): work all sts in patt, increase one st at end of row. Then, increase one st at neck each row three more times, then every other row twice (same as the decreases you did for left front)
Next WS row: work all sts in pattern. Cast on 6 sts using backward loop method. Replace back sts to needles (if necessary) and join the front and back.
Work in pattern for 4.5-5.5 inches (or to your measurements).
Cast off 20 sts at the beg of next two rows so you are left with only the right sleeve sts on the needles.
Work so that the right sleeve is the same length as left sleeve and cast off all sts.


Now you will pick up sts for the back and both fronts.
Once these steps are complete, the piece needs to be blocked.

After drying, I sewed the seams up the side and sleeves. Next, I knit the collar then the button band. I did 1 x 1 rib for the collar and 2 x 2 rib for the button band.
A final blocking of the finished sweater may be necessary for the collar and button band to lie smoothly.


Encased Cable Panel (worked over 26 sts)
Row 1 (RS): p3, k3, p4, k6, p4, k3, p3
Rows 2, 4, and 6: k3, p3, k4, p6, k4, p3, k3
Row 3: p3, k3, p4, 3/3 LC, p4, k3, p3
Row 5: Rep row 1
Row 7: p3, 3/2 LC, p2, k6, p2, 2/3 RC, p3
Row 8: k5, p3, k2, p6, k2, p3, k5
Row 9: p5, 3/2 LC, 3/3 LC, 2/3 RC, p5
Row 10: k7, p12, k7
Row 11: p7, (3/3 RC) twice, p7
Row 12: Rep row 10
Row 13: p5, 2/3 RC, 3/3 LC, 3/2 LC, p5
Row 14: Rep row 8
Row 15: p3, 2/3 RC, p2, k6, p2, 3/2 LC, p3
Row 16: Rep row 2
Rep rows 1-16 for Cable Panel


2/3 RC: sl 2 sts to CN, hold in BACK, k3, p2 from CN
3/2 LC: sl 3 sts to CN, hold in FRONT, p2, k3 from CN
3/3 RC: sl 3 sts to CN, hold in BACK, k3, k3 from CN
3/3 LC: sl 2 sts to CN, hold in FRONT, k3, k3 from CN


Double Cable panel(worked over 12 sts):

Row 1, 3: knit
Row 2, 4, 6: purl
Row 5: C6B, C6F
Repeat rows 1-6 for pattern


C6B: sl 3 sts to CN, hold in BACK, k3, k3 from CN
C6F: sl 3 sts to CN, hold in FRONT, k3, k3 from CN

Please let me know if you knit this (or anything similar)!!!
By the way, I would have had this up a week ago, but my family vacationed for Thanksgiving. I'll post details (along with updates on my new project) later.